It's not about the Tech. It's about the teach. --Ewen McIntosh

Tuesday, May 2, 2017

Change Google Doc Permission to ANYONE CAN VIEW with One Click

Here's a solution to that annoying "You Need Permission" issue with Google Drive.

AnyoneCanView Chrome extension. When you are in a Google Doc, Slide, or Form, just click on the extension and with a single click--voila--the permission changes from "private" to "anyone with the link can view." Without the extension, this is a nine-click process. We teachers get used to it, but it is difficult for some of our students to remember all the steps. Have your students install this Chrome extension so they can change the permissions before uploading it to an external digital portfolio. (We use Seesaw and if the Drive permissions are not set correctly, parents cannot see the work they've uploaded.)


Friday, March 3, 2017

Insert Your BITMOJI in Google Slides Comments

Needless to say, Bitmoji is a fun way to personalize text messages and emails. (If you haven't created yours yet, you can add this Chrome extension. Did you know, however, that you can add Bitmoji to the comments area in a Google Slide deck?

Just click on the extension and search for what you're looking for, then drag the image to the gray comments area on a Slide Deck. (Note: this works for Google Docs too, but the images won't go into the gray comments area--you have to add them directly into the document. There are many Bitmoji options for student feedback that are good, but you will find that some of the choices are not school appropriate... If you need to crop out part of the image, such as a word you don't want to use, just double click on the image and use the crop marks.

Your students will enjoy seeing your animated comments. Of course, you can also add text comments too if you need to say something more specific. The Chrome extension makes it easy to drag your avatar into emails. On a Mac, you can copy and paste into the Messages app.

I have even used Bitmoji in a Google Form (right click on your Bitmoji selection and click "Copy Image Address," click the "Add Image" icon in Google Forms and then paste the URL. See just a part of a question and two of the answers with pictures below:

Friday, February 24, 2017

Google for Education Certification Program

So THIS happened yesterday!

I was pretty excited to receive this email after years of learning and implementing G-Suite (formerly Google Apps for Education). I began my journey as a classroom teacher wanting to incorporate the Google tools with my students to maximize its collaborative features. Are you interested in pursuing Google Certification? There are many benefits, even for those who have no plans to enter the EdTech field. Google for Education has four certification programs:

1. Google Certified Educator, Level 1 

Google for Education offers this course "designed for educators and classroom teachers who wish to demonstrate proficiency in using Google for Education tools" (Google for Education). The Level 1 certification indicates that an educator is able to successfully implement G Suite for Education into their teaching practice in order to enhance teaching and learning. You'll learn the basics of Docs, Slides, Sheets, Forms, Calendar, Sites, Blogger, and more. Exam length: 180 minutes, no pauses. Exam fee: $10. Exam is proctored. It is pass/fail (80%) and you get your results right away. Here are a couple of sample exam questions from the training site:

Multiple Choice Sample Question 1

Objective: Use technology to move beyond textbook-based instruction

Students in your history class are having difficulty understanding the significance of World War II. What activities could help students get more engaged? (Choose 2 answers)
  • Students create YouTube videos describing key battles in World War II
  • Teacher creates a final exam in Forms to give students a grade on what they know 
  • Students use the Research Tool to search for more information in Docs
  • Students answer questions at the end of the chapter on World War II 


Performance Based Scenarios Sample Question 4

Objective: Annotate and share videos

You want to be sure that students are able to view your “Award Winners” broadcast at a later date.
You decide to share the video again via your YouTube channel to maximize views. Complete the following tasks.


  • Find the “Award Winners” video on your YouTube channel.
  • Use annotations to add the title “We won!” for the first 5 seconds of the video. 
  • Share the video with your student group nfschool@myeducert.org. 


2. Google Certified Educator, Level 2 

The Level 2 status indicates that an educator is able to successfully integrate a "wider range of Google for Education tools and other technologies in order to transform their teaching practice" (Google for Education). Exam length: 180 minutes, no pauses. Exam fee: $25. Exam is proctored. It is pass/fail (80%) and you get your results right away.

3. Google Certified Trainer


"Google for Education Certified Trainers are passionate and driven education professionals with a desire to help others transform classrooms with technology" (Google for Education). Attaining this status certainly does not mean I know everything there is to know about G Suite, but I do know where to go for answers! I will have access to a network of other educators, trainers, and innovators. I am looking forward to tapping this powerful network. To be certified, educators must be attain Google Certified Educator Level 2, take the trainer course, pass the Trainer Skill Assessment Exam (80%), and submit a two minute video that demonstrates one's personality and training style. Trainers are added to the Google for Education Directory.


4. Google Certified Innovator

"Candidates for the Google for Education Certified Innovator program are selected based on their professional experience, their passion for teaching and learning, their innovative use of technology in school settings and their potential impact on other educators. They are ambassadors for change who empower other educators and students through a thriving innovation culture within their own classrooms, schools and organizations." Since innovation happens in many different roles, applicants are encouraged from all backgrounds--from classroom teachers to district administrators. Prerequisite: Google Certified Educator, Level 2. Applicants must present a vision presentation and video along with application. Innovators are added to the Google for Education Directory.
SaveSave

Tuesday, February 21, 2017

Seesaw Ambassador


I'm now an official Seesaw ambassador! What does this mean? I'll be paying attention to updates about new features and hold PD sessions with my colleagues and sharing my PLN. I have two very small Seesaw tidbits to share today. First, it's spelled Seesaw, not SeeSaw, See Saw, or seesaw. Second, in the new(ish) labeling feature, students can edit the look of their labels (size, shape, color, etc.). They can also drag and rotate the labels. Here's an example:


Best use practice: If you want your students to label a photo, diagram, etc. you post, have them click the 3 dots and choose copy and edit. Here's how it works:


Tuesday, February 7, 2017

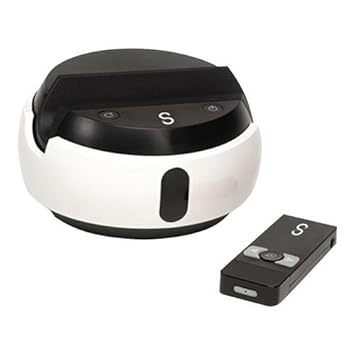
Swivl as a Reflection Tool

Thanks to Carolina Seiden, who introduced this transformative tool in our upper school a while ago, we now have a Swivl in our middle school that teachers can check out from the media center at any time. A Swivl records you as you teach so you can learn from reflecting on your teaching practices. It "follows" you as you move around the room. It is a self-reflective tool; all of the videos go to your own cloud account. You choose what do do with them: keep them, download them, store them in your Google Drive, share them, or delete them. Click on the pictures below to enlarge the photos of the Swivl.
      

Saturday, February 4, 2017

Silicon Valley

In January, I had the incredible opportunity to accompany a group of high school students on a week-long field trip to Silicon Valley. The purpose of the trip was for students thinking about majoring in a tech field to see and explore a number of major companies, as well as some small startups. We toured Google, Apple, Facebook, Instagram, and LinkedIn. We met with young entrepreneurs at Seesaw, Amplitude Analytics, and Kamkord.


We also visited Stanford University, Alcatraz, Giants Stadium, Fisherman's Wharf, and more. It was an unforgettable trip. Two of our students said they made decisions about their future based on this incredible experience!


Tuesday, January 31, 2017

Organize your Inbox with Gmail Filters

As part of my own professional growth for this year, I have set a goal to share weekly tips and resources that will help my colleagues save time and energy. Some are easy, beginner tips, and others are for those who aim to be power users. Here's the first Tuesday Tech Tips....


1. Gmail Tip: Are you stressed out just by looking at your inbox?


2. Super Easy Chrome Tip: You can permanently keep tabs open for your most important sites (such as email, MySA, Google Drive (or a specific folder in your Drive), Seesaw, Google Classroom, etc. Just right click on the tab and select "Pin Tab." When you close and reopen Chrome, all your pinned tabs will reopen.


3. New Seesaw Feature: Now you or your students can add customized LABELS to any drawing or photo.

4. Fun iOS (iPhone or iPad) app for teachers: Decide Now (Customizable wheel--add your students' names, tap the--and it will randomize selections to keep students on their toes. This app used to be free, but I think it may cost .99 now).

Monday, June 20, 2016

Presentation for NMC 2016 in Rochester, NY: Evolution of a Digital Citizen

On June 16, 2016, a team of four “AFTers” (Academic Facilitators of Technology) presented at NMC--New Media Consortium, an international EdTech Conference held this year in Rochester, New York. We presented on how we approach teaching Digital Citizenship in grades K-8. Our presentation was interactive. We prepared nine iMovie trailers to feature student work and our comprehensive approach to #DigCit. We provided the iPads and headphones (each attendee got their own earbuds; we ordered them in bulk on Amazon for next to nothing). They walked from station to station and scanned the QR codes for each grade level to launch the trailers. They were challenged to tweet a response. One of our presenters joined us virtually from across the country. She manned the Twitter feed


CLICK HERE to access our Presentation Slides and see our iMovie trailers. I hope it will inspire ways to incorporate Digital Citizenship in your school.


SaveSave

Tuesday, January 26, 2016

I Stream, You Stream, We All Stream...

My First Periscope Broadcast…Newbie Insights for Teachers New to Periscope

The past year has been explosive for the live streaming movement. UStream, Meerkat, Periscope–and now even Facebook and YouTube–are examples of live streaming platforms that allow ordinary people to broadcast live to the world. Of course, a quick glance can reveal a lot of boring, uneventful, ridiculous, and even shady streams. I had heard about Periscope in the past few months, but never checked it out until recently.
Our 7th grade students recently visited a local sea turtle hospital as part of a two-week community service project. They held a “turtle toy (supply) drive,” did a beach clean-up, and made a video for an iBook that will eventually be published on iTunes. I was so excited about this project (collaborative effort of science teacher Stacy O’Connell and media specialist Danielle Wishka as part of her ADE Project) that, even though I had no experience–and not a lot of confidence being on camera–I decided to broadcast the field trip on Periscope.  I did a couple of practice scopes (I’m so glad I did!!!) and went for it.


Here are a few things that I have learned in these first few broadcasts:
  • Check your school’s policy regarding social media and photographing students. I obtained permission in advance and took steps to protect our students’ privacy.Do a test run! In mine, I actually forgot to add a title…
  • Type out your title on another app (such as Notes), then copy & paste onto the title entry bar. (It’s easy to make a mistake if you type your title on the fly.)
  • Use hashtags to attract the appropriate audience for your scope.
  • Use emojis in your title to draw attention (but overkill can be annoying). I went with:🐢☀️🐢 7th Grade Community Service Project at South Florida #SeaTurtle Hospital #PeriscopeEDU #PeriscopeTeachers 🐢☀️🐢
  • You may want to pre-tweet your broadcast.
  • Don’t forget to tweet out your broadcast (see below).
  • Limit the length of your broadcast. Mine was way too long-90 min; however, I knew in advance that people wouldn’t be viewing the entire broadcast.
  • Settings–there are 4 icons control the privacy of your broadcast:
  • Location (circled in blue in diagram, rt.): Think carefully about this one, especially if your scope involves students. When selected, your broadcast will appear as a red dot on the map and anyone on Periscope can see your location and comment as you broadcast.
  • Private broadcast (green circle): allows you to limit your broadcast to specific people. This is good for testing things out!
  • Limit chat (pink circle): If you select, only people you follow on Periscope will be allowed to chat (add comments and give you hearts).
  • Twitter icon (yellow circle): This will automatically tweet out your broadcast.
  • I chose not to broadcast my location for this scope for security purposes and because I didn’t want random people (aka trolls) to view or comment on my scope. Not broadcasting your location means your audience will be limited to those who follow you on Periscope and Twitter (and anyone with whom they share).
It was an incredible experience to broadcast our students in action making a difference for these sea turtles! The biggest thing I gained from the process is to discover how much I have to learn! The experience left me excited to explore more ways to showcase the work of our students and teachers, as well as to continue make global connections.

Friday, January 15, 2016

The Critical Five Minutes of Class

“You’ll never get a second chance to make a first impression.” This often quoted truth is so common, in fact, that its origin is unclear. Some attribute it to Oscar Wilde, others to William Safire. Regardless, it’s certainly not a hotly debated issue. In general, people understand the importance of first impressions. In his article “How Many Seconds to a First Impression?” which was posted in The Association for Psychological Science, Eric Wargo writes about how–whether fair or not, we are all judged by a number of things: our appearance, how we dress, our age, etc. The part that stinks is that most of these judgements are upon things over which we have no control! As educators, we have the responsibility to focus on those things we CAN control. The first day of school is perhaps the most notable occasion we have to strike a positive first impression with our students, but fortunately, we have a new opportunity every day we see our students to impress them–or not. The first five minutes of class each day will set the tone for the next fifty. Teachers need a few minutes to gather thoughts and resources between classes, take attendance and just simply RESET.

I recently walked into our library, where our Media Specialist Danielle Wishka (@daniwishtweets) had this image on display at the mediascape. She had a fun song playing and I couldn’t help but noticed that all the students were typing away on their laptops as they rocked out to the song. At the end of the song–less than 5 minutes into class, the students were fully prepared for class. No prompting, nagging, or redirecting was necessary.
There are MANY ideas out there for these “bell ringer” activities. Here are a couple of links to some excellent blog posts with many ideas:
Find a few activities you like and try something new! Have other ideas? Please add them to the comments below!


Sunday, December 6, 2015

Authentic Learning Can Be Messy

One of the parts of my job as Technology Integrator (or “Tech Coach” as I like to call it) that I love most is that I have the privilege of working with a team of such high quality professionals at my school. Yes, I am able to introduce some strategies for implementing technology to enhance a lesson or drive home learning objectives, but at the end of the day, I benefit so much from collaborating with our amazing teachers as I learn from their array of teaching styles and abilities.
The classroom I am discussing in today’s post is one that would have made many of our own childhood teachers–and if we are honest, some of us—
extremely uncomfortable. This was not the type of classroom where students sat in neatly arranged rows or small, balanced groupings of three or four. Students didn’t always raise their hands before speaking. Some stood, while others sat. The room was buzzing with activity. I had provided a few prior introductory lessons in basic coding with Scratch, our media specialist introduced the makey makey circuit boards, and the science teacher, Ms. Kopels, introduced basic circuitry. Now, the students had the opportunity to combine these three concepts to explore electricity and complete a series of self-directed challenges.


Not every teacher can tolerate this type of learning environment. At first glance, it may appear to be disorganized, even chaotic. A more traditional classroom, like the ones from my childhood, has specific rules against such behavior. Expectations are set on the first days of the school year and students held accountable for upholding these rules for every lesson, every day.


Now I’m not saying that this “messy” type of classroom atmosphere works for all learning activities, but I know one thing: there was 100% student engagement in this class. One hundred percent! A couple of the students sat on the table with legs dangling over the side. A few others were on their knees, eye-level to their challenge on the desktop. Multiple voices could be heard at the same time throughout the room–some louder than others. The one thing that made this class different from a “traditional” classroom was the fact that although Ms. Kopels had carefully planned the lesson, the students were genuinely self-directed as it was carried out. There were very few times that her voice could be heard over the general chatter in the classroom. How many times can any of us say that we can hold our students’ attention in this way? What made this lesson so successful? I’m going to share five observations that I believe contributed to Ms. Kopels’s success in this lesson:
  1. Students had something to do as soon as they walked into the room–something for which they were accountable. Call it a “bell ringer” or warm-up activity, or whatever. These students had been conditioned to look for what to do when they arrive each day. Not only does this prevent lingering or mischief in those brief moments between class, but it sets the tone for the class and is the perfect opportunity to creatively “hook” the students into the lesson. A quick glance at the board and the students were busy at work.
  2. Students knew what to expect. The teacher was just specific enough to communicate the general flow for her students by listing the class activities on the board. This list was broad enough to allow for and take advantage of the students’ questions, ideas, and suggestions–which brings me to my next observation:
  3. Students had freedom to explore, question, and draw their own conclusions.This structure requires an open minded instructor who isn’t afraid to take some risks. There are so many “what-if’s” that can intimidate a teacher. “What if a student poses a question I can’t answer?” “What if students’ questions divert them from a concept I’m trying to drive home?” “Won’t I be losing control of the class, and consequently, lose my students’ respect?” I  recently read a blog post about a principal who introduced himself as the lead learner in his school. It takes a degree of humble confidence (yes, I know –it’s an oxymoron) to be a learner in one’s own class, but I have learned from experience that students will have far more respect for a teacher when (s)he is not too proud to learn something new along with–or yes, even from students!
  4. There were a variety of activities in the class. Students worked with a partner, in a small group, but came together as one group at the end of class to share their questions, challenges, approaches, and conclusions. Interestingly, the students knew that the “rules” were completely different for the wrap-up, whole class discussion in these last 10 minutes of class.
  5. The lesson had specific closure. Students knew there was a clearly communicated “exit ticket” to demonstrate that they had met the lesson objective(s). I will address exit ticket ideas & strategies in a future post.
Most teachers today understand that our students need a variety of learning activities to remain engaged. We know that the best lesson combines different activities and groupings. We realize that when it is crafted to bring out the best in our learners and in our lessons, technology can enhance engagement and learning. We still have a way to go in giving up the comfort of “controlling” every aspect of our lessons. Yes, this type of learning can be messy, but let us consider how this “unstructured” learning can be the most engaging and consequently, the most effective learning for our students.
My next post will address some creative approaches for class starters or “bell ringer” activities. Follow this blog to get an email notification for new posts.

Monday, November 23, 2015

Technology Does Not Guarantee Engagement

Photos by FutilityBucket

I imagine that most people who would read a blog like this are educators who agree that one of the benefits of technology in education is that it increases student engagement. I wouldn’t be a technology integrator if I didn’t believe this to be true. When I was in grad school, my Emerging Tech professor challenged us with the question, “Does technology increase learning?” At first, we were confused. I mean seriously—this was a graduate program for Instructional Technology! Although a few argued “no,” most of us were in the “yes” camp. We read scholarly articles on both sides of the issue. His question made all of us us dig deep for research that would back up our (existing) opinions. After much reading, analysis, and debate, our professor pointed out that the body of research was quite clear. With nothing else taken into consideration, simply adding technology does not result in increased learning.

The only real difference in the two pictures above is that the resources in the second picture are a lot more expensive. Introducing technology may be “state of the art,” but if it doesn’t increase learning, where is its value? In short, “Technology doesn’t revolutionize education. Teachers do.” —Derek Muller (@veritasium). In its recently published Teachers Know Best study, the Bill & Melinda Gates Foundation, has found that “Despite the proliferation of technology that enables student learning experiences to be tailored to meet individual skills, needs, and interests, most teachers [69%] still report working in classrooms where students generally learn the same content, working at the same pace together as a class” (Nov. 2015).
Technology will only enhance the pedagogy that is already present (paraphrased from Eric Patnoudes @NoApp4Pedagogy). If a teacher struggles with classroom management, and you add technology to the mix–the result is chaos. An instructor who lectures day after day will likely find his or her students off task during class if laptops or mobile devices are introduced. On the other hand, when technology is added to the repertoire of a good teacher who (already) connects with students and utilizes a variety of methods to challenge and engage them, the potential for engagement and learning is limitless.
Which is best: 1:1 Laptops, iPads, Chromebooks, B.Y.O.D.? The focus needs to be removed from which devices we should use and placed instead on how to guide our learners to tap the power of technology to accomplish things that were never possible without them. (Think “R” of SAMR.) It has always been–and will always be–about pedagogy. Technology will only enhance the pedagogy that is already present.

It’s not about the tech. It’s about the teach.     
--Ewan McIntosh


This post is the product of a week-long reflection on a two day professional development event, Miami Device, that I attended last week. This was the second year of the event. Last year, I attended mostly practical sessions that highlighted specific apps and techniques I could apply immediately in my classroom. This year, I ended up selecting sessions that were more theoretical in nature. At my school, we are in the midst of developing a school wide technology plan, so the timing was perfect.